If you find our posts useful for getting out, wait till you see the app we are developing. Please consider signing up for the beta of our app, which aims to help you get outside on excursions faster and safer!
Introduction
Climbers, skiers, surfers, hikers, accountants… calling all dirtbags! Are you looking for a way to stealth camp and move quickly through regions? Have you spent too many miserable nights in a swimming pool of a tent? Is your boyfriend deathly afraid of racoons? Would your acquaintances describe you as homeless?
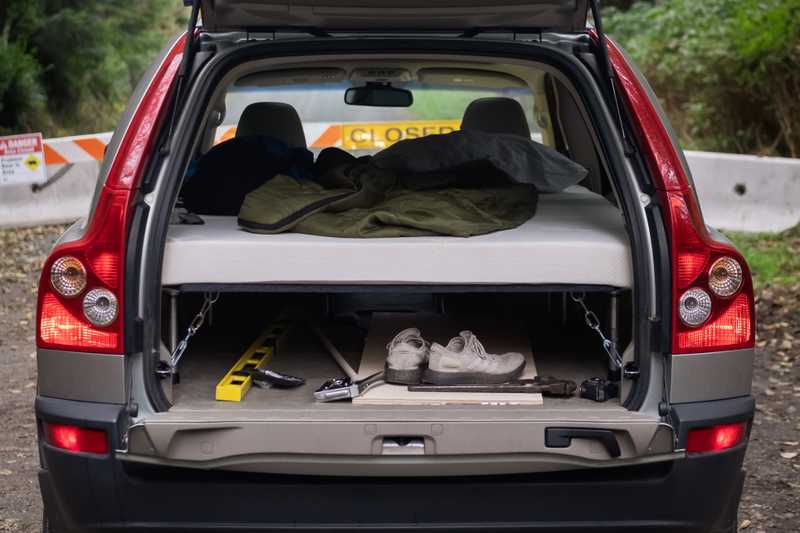
If you answered “I guess?” to any of the questions above, you’re in luck! We’re about to walk you through a simple and awesome modular sleeping platform build for your car or SUV. After countless hours of planning, and several major rabbit holes, we’ve put together what we think is the best and simplest design for getting out car camping in the comfort of a hard side vehicle. This design was created with three goals in mind:
Modular - Twin platform sections allow for easy addition/removal from the vehicle, and allow the rear seats to work with a single platform remaining in the trunk area. Removable legs allow for the platform to be easily stored when not in use.
Space Efficient - Raised sleeping platform allows for significant storage underneath. Under-bed storage containers work great with the build. Take the containers out and store them under your actual bed at home when not in use.
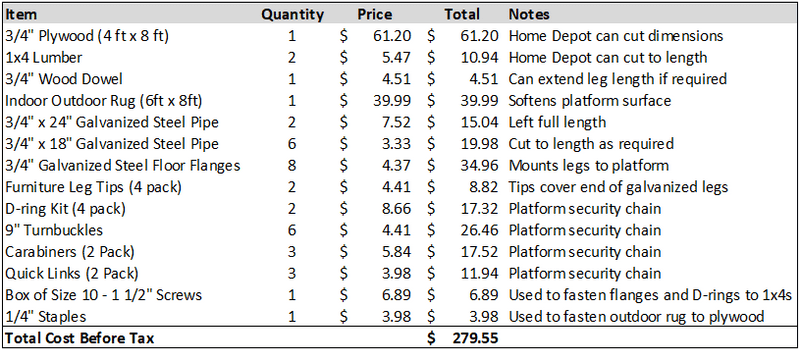
Cost Effective - You should be able to put this together for between $275 to $535 (CAD, before tax) depending on how many nice-to-haves you add, and how many tools you can borrow. Not bad!
This platform was designed around a foam tri-fold mattress that we knew would fit within the dimensions of our vehicle, would be comfortable, and easily removable with its tri-fold design: Milliard Full Tri Folding Mattress. We've been super happy with it so far, and the folding design allows us to store more gear while in transit. I would note that these guys have a variety of mattress sizes that should work for your individual situation.
1. Materials and Tools
Core Materials
Nice-to-Haves
Tools
- Medium to long length bubble level
- Tape measure
- Wood handsaw
- Sandpaper
- Utility knife
- Staple gun
- Power drill
- 1/8th drill bit (taped or marked ~1 inch from tip, to drill correct depth)
- Square screw driver bit
- Pipe cutter (hacksaw could work too)
IMPORTANT: Home depot and other hardware stores can cut your plywood and lumber to required dimensions when you purchase it, which will greatly help you with avoiding long cuts.
2. Prototyping Your Platform
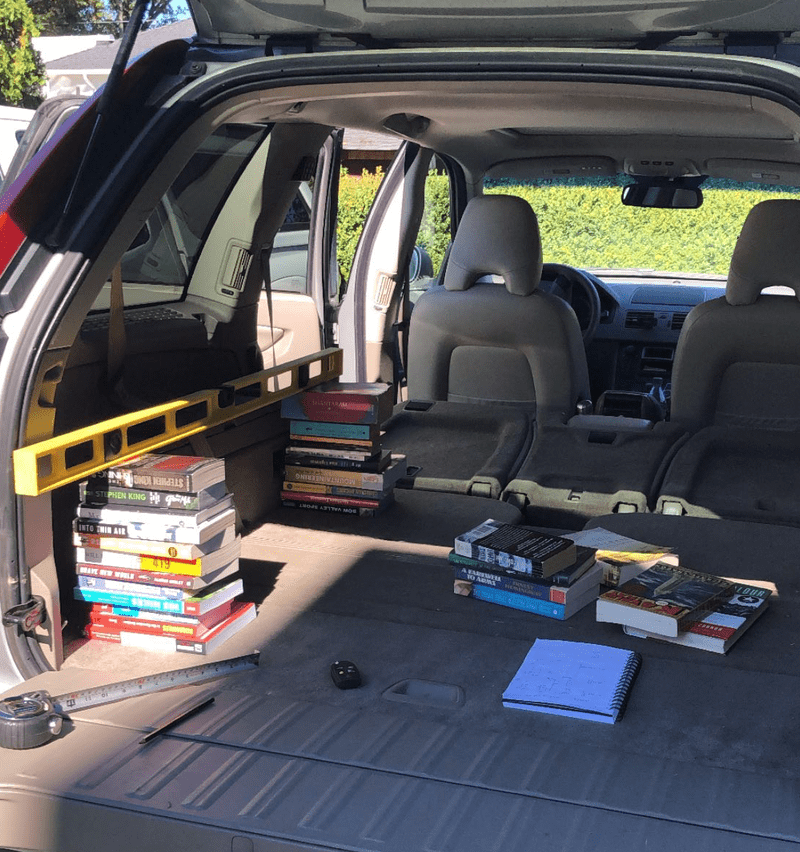
Begin the process of your platform build by prototyping the platform for your vehicle. At this stage, you’ll want your long bubble level, a tape measure, stacks of books or other objects to manipulate the height of the level, and your notebook and pencil.
The key items to measure and consider at this stage are:
- The potential length of your total platform. Ours ended up being 73” long, the same length as our mattress.
- The length of each of the individual platform sections – will section 1 (Trunk) be able to remain in rear of your car with the rear seats folded upright? Be sure to measure the length at the correct HEIGHT, as your rear seats lean backwards further as you increase in height from the floor.
- The width of your vehicle – will a full 48” wide sheet of plywood fit in your vehicle? Will a plywood board fit through the tailgate entrance of your vehicle?
- Where is a reasonable location for each of your eight support legs? Using the bubble level and stacks of books, estimate the height of each of your leg sections. Be especially aware that your platform will likely need to be higher than your wheel wells. Our platform ended up 10 1/2” high at the trunk end.
- Where are the cargo holds/hooks in your vehicle? Would they be accessible for your turnbuckles based on where your legs will be positioned?
The most important measurements at this stage to get right are the dimensions of your plywood platform – when you get them cut to size at your hardware store, you’ll want to make sure you got it right. Some of the other estimates around leg location and length may continue to be modified.
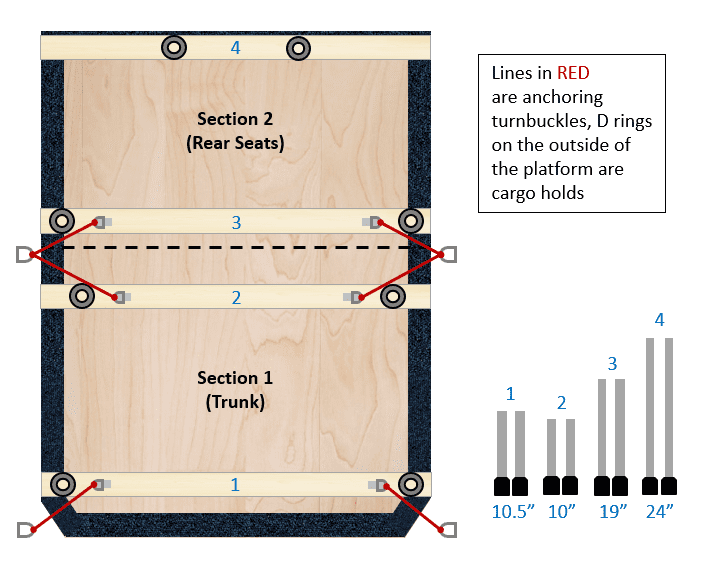
Below is a high-level example of our platform design – measurements will be unique to your vehicle.
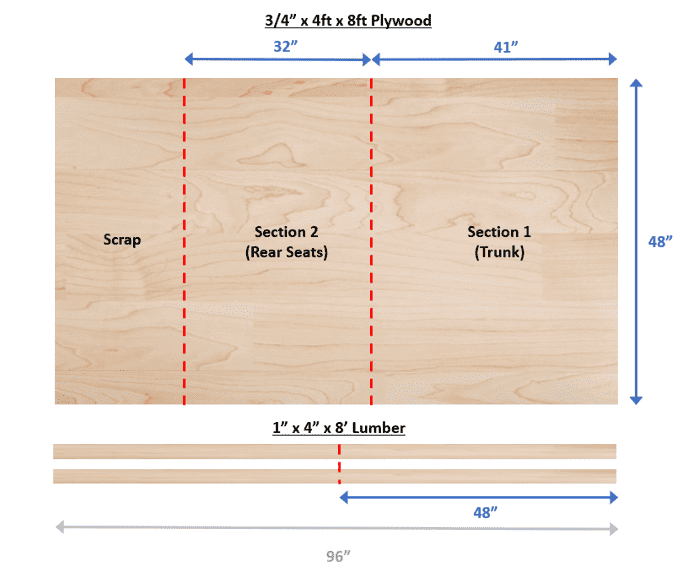
3. Picking up Materials & Initial Cuts
Wood and many of the required materials should be straightforward to pick up from any hardware store in your area. Most stores will be able to make the required wood cuts for you when you buy it, which can save a lot of headaches as far as required tools, and transporting it home. Note that while the lengths of your platform sections will be unique to your vehicle, the 1x4 lumber boards should all be cut to 48", to match the width of the plywood platform.
3/4" Galvanized steel pipe and flanges can be a bit more of a challenge to source – some hardware locations may have it and others won’t. Try calling ahead or using the websites of different store locations to see if it is held as inventory.
The biggest challenge was finding an indoor-outdoor rug in a 8’ x 6’ size that we could use for covering the platform. We ended up finding ours at Canadian Tire for around $40.00, along with our under-platform storage bins and LED light pucks.
4. Dry Fit #1
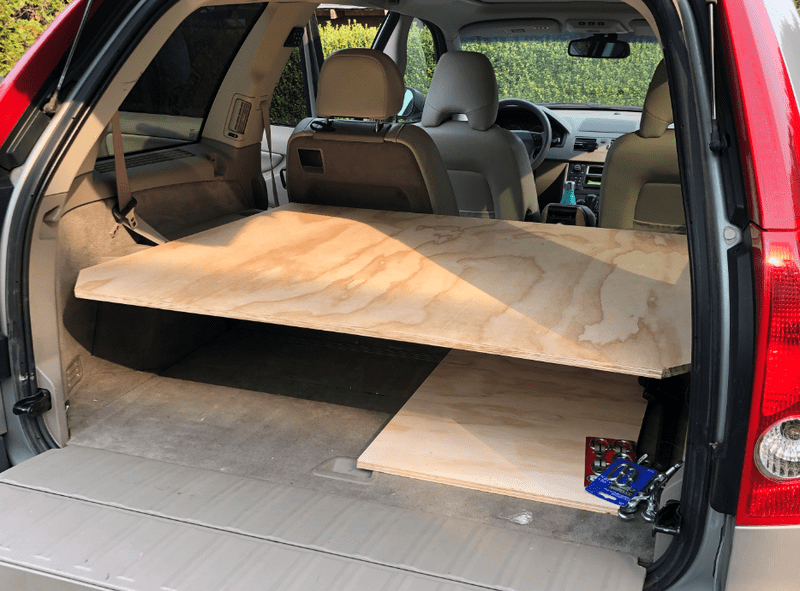
After returning home with your plywood pieces, you should have the opportunity to dry fit the sections into your vehicle to confirm they’ll work with your vehicle dimensions.
Note that on our rear platform, we needed to make two additional diagonal cuts to make the platform fit properly. We can also see that our trunk platform section should be able to remain in the vehicle with the rear seats folded up. Good stuff!
This is also a good opportunity for you to confirm the potential locations of your 1x4 support beams, and the locations and length your legs.
5. Carpet Covering
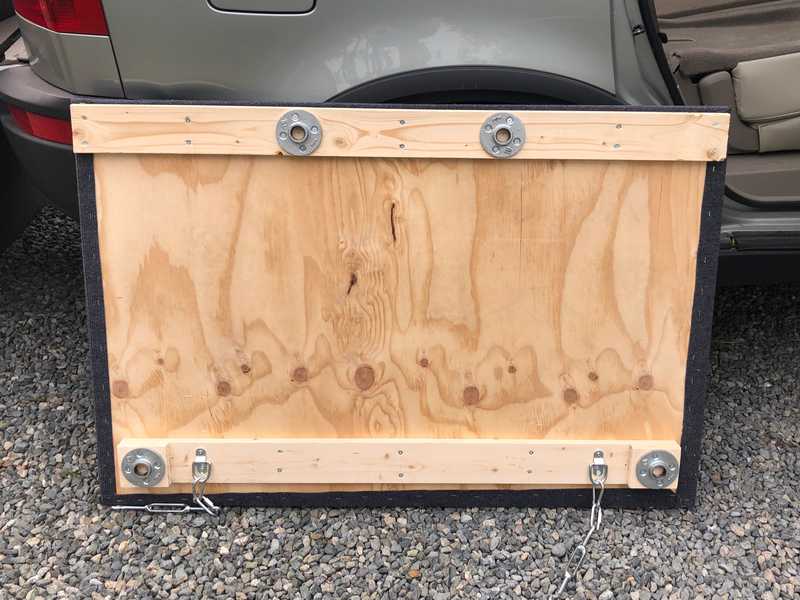
The platform sections can now be covered with the indoor/outdoor rug, and stapled down to provide a soft but durable sleeping platform that won’t snag on any of your soft goods or mattress. This material is great because it is designed for dirty environments and can be cleaned or vacuumed easily after going through the rigors of camping.
Rolling out the carpet with the corduroy side down, place your plywood platform on top of the carpet, and cut the carpet to size using your utility knife. Aim for a 3-5 inches of excess edge, which will allow you to staple it to the platform when folded back over the plywood.
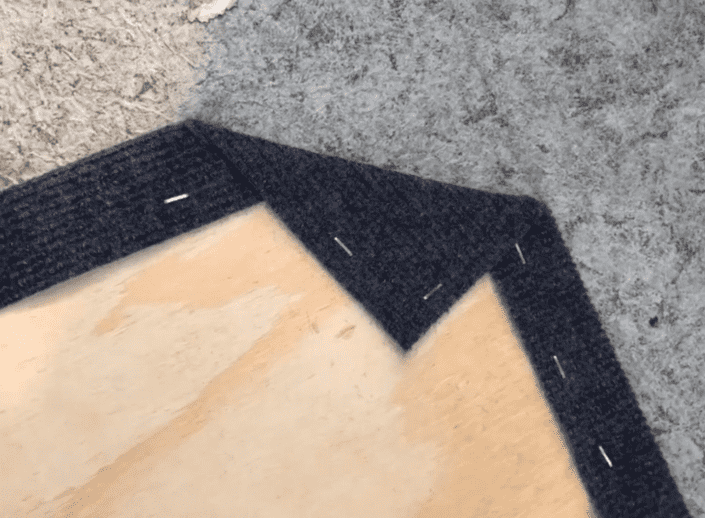
As you begin stapling the carpet to the platform, make sure that the carpet underneath is tight without any creasing, pulling the carpet tight and stapling on alternating sides of the platform as if you were stretching an art canvas onto a frame. This should create a reasonably snug rug fit. To finish the corners, you will need to cut excess material out of corners of the fabric to fold it down cleanly. I’m sure there’s an elegant way of doing this, but it's also not rocket surgery.
6. Support Beam & Flange Attachment
With your top carpet layer now stapled to your platform sections, it is now time to mount your 1x4 support beams crosswise. This comes with a few steps:
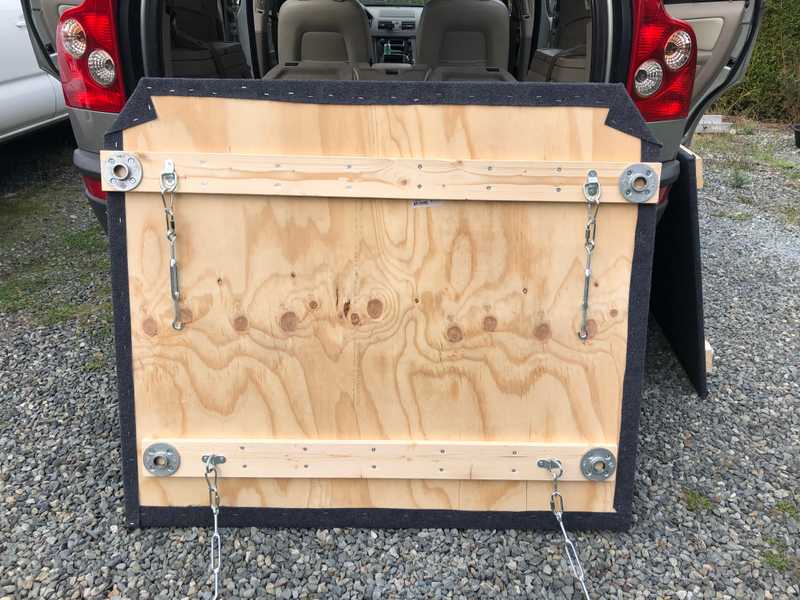
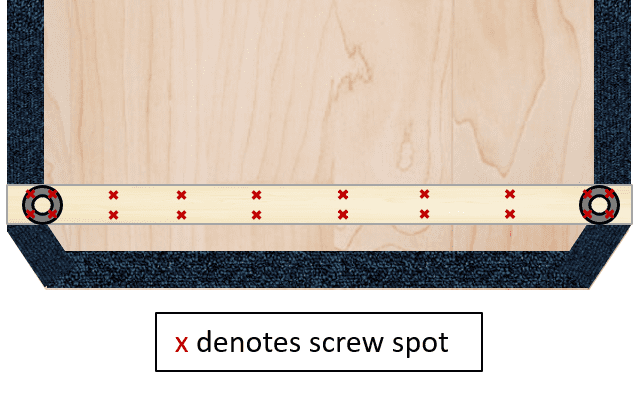
- Placing your 1x4 beam and 3/4" flanges into their confirmed locations (light brown wood and dark grey donuts in diagram below), use your drill and 1/8th drill bit to pre-drill screw holes approximately 1” to 1 1/4” deep, through the support beam and into the plywood below. To make sure you are consistent with your drilling depth, use a piece of tape on your drill-bit to mark the correct depth. You do NOT want to drill straight through the other side of the plywood into your carpet. Aim to have screws in pairs, every 6” or so along the beam.
- After pre-drilling holes for a single beam, take your screws, and affix your beams and flanges, again aiming to not drill through to the rug side of the platform by over-drilling.
You may find that you want to complete your first trunk platform section initially with legs in the next step, before progressing to the second rear seat section. It might make your beam and leg location assumptions easier to make for your second platform if you do.
7. Legs
Things are taking shape at this point! We are going to now size our legs for each section.
- At this point, you will want to slide the rubber furniture leg tips onto the ends of your steel pipe legs, and hand tighten the legs into your platform flanges - make note of the new increased length of the legs with the tip and flange attached, along with the increase in height from the support beam. MAKE SURE to factor in these increases in platform height when you go to cut your legs to length.
- Factoring in how the tips, support beams, and flanges impact the height of your platform, measure and mark your steel legs, and use a pipe-cutter (rated for thin steel) to cut your legs to length for your section.
- Transfer the rubber furniture tip to the cut end of the pipe, and screw into the associated flange.
- IF YOUR LEG LENGTH IS INCORRECT, you can use a 3/4" wooden dowel spacer within the cup of the furniture tip to lengthen the leg, or additional wood pieces under the steel flange if it is really far out. Everyone makes mistakes!
8. Dry Fit #2 & Turnbuckles
At this point, you should have at least one (or both) of your platform sections completed with legs, with the ability to dry fit the platform into your car a second time.
- Place one or both platforms in position in the car.
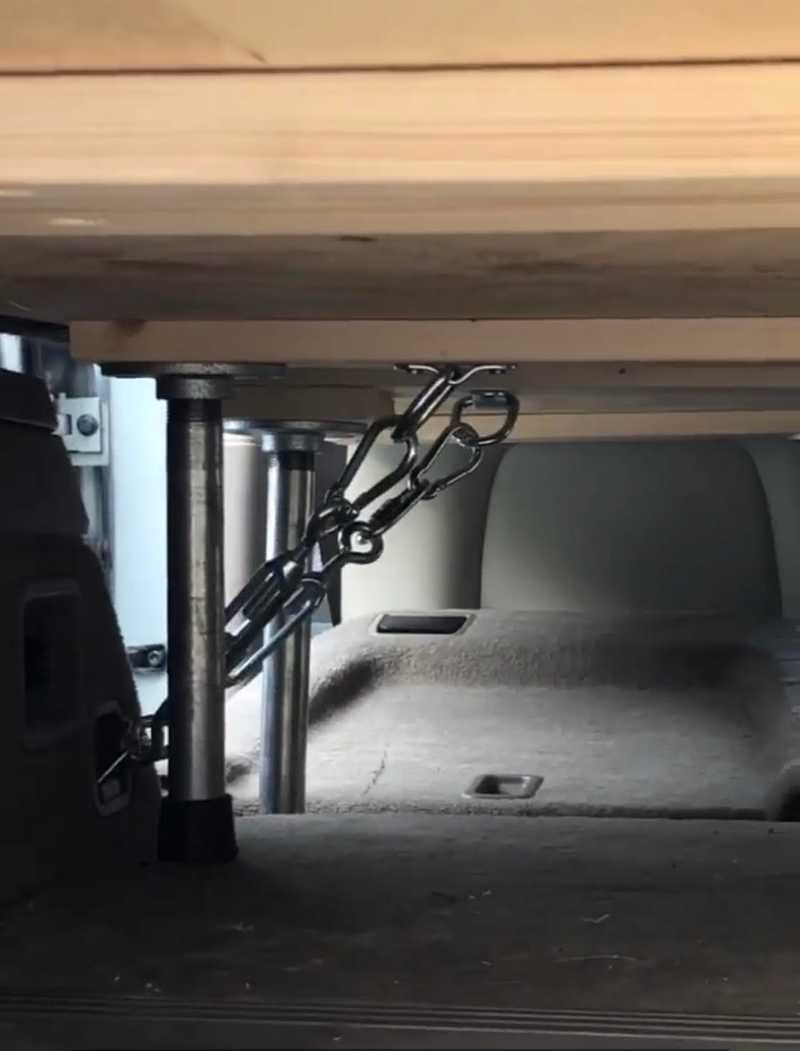
- Combine a turnbuckle, quick-link, and carabiner to form a chain that will be used to secure the platform to the cargo holds of the car.
- With the turnbuckle 50% loosened, use the hooked end to grab the cargo hold ring and the other end to estimate the location of the D-ring for the platform. Mark with a pencil.
- Remove platform from car.
- Pre-drill screw holes for the D-rings.
- Screw D-rings down into position, clipping carabiner onto the D-Ring
- Rebuild platform in car, cinching down turnbuckles to tighten the whole system and secure the platform.
9. Other Considerations
If you want to take your car camping situation to another level, take a look at some other great ways to improve this build:
- Using a folding foam mattress for your platform such as the The Milliard Full Tri Folding Mattress with Washable Cover (73 inches x 52 inches x 4 inches). The advantage to this mattress is the ability to fold it up for storage, but additionally, having the ability to fold a single section of the mattress up to allow the storage of coolers, water containers, and other camping/gear items on the rear of your platform while in transport.
- Underbed storage containers can make quick work of storing car camping gear, activity gear, dry food, wet goods, and other things under the rear platform. I can have all my car camping gear/kitchen in them, which I actually store under my bed at home when not in use.
- Under platform LED lighting is super super convenient when the sun goes down. Get 3 battery powered pucks, and place one under the tailgate end, and one under each side of the platform closest to the rear passenger doors. Get your own 3M brand velcro mount tape for these so you can remove them when you want.
- There are plenty of great bug mesh options out there to help you keep your windows throwing breeze in the summer months without letting in any mosquitos. These also serve to provide additional privacy by tinting the window when up.
- Given that many vehicles will not provide an electrical flow while turned off (and you don't want to kill your car battery), it can be a good idea to have some secondary power sources for charging phones/lights/electronics. Jackery makes an affordable option that has lots of charge capacity, and can recharge from your running vehicle or solar panels. You could definitely use to power an electric blanket too depending on wattage. Check it out: Jackery Portable Power Station Explorer 240
If you enjoyed this post and want to see more videos detailing the build of this platform, be sure to follow our instagram page, where you can look through our highlights on this build.
HAPPY CAMPING!
While we are not sponsored by any of these brands, some of these items have affiliate links and we will make a small percentage off the value of a sale. Rest assured, we use all of these items, and believe in their value. Think of these links as a way of giving back for using this detailed instructional guide above for your platform build!
Cover photo by Jimmy Conover on Unsplash
